Sunday, November 15, 2009

Finally!


The base for the Kiln is finally completed! I built the firebox walls up to level with the second loading chamber for strength of walls. On top of this base will be the arched top of the Kiln.
Also finished is the base for the side loading door and the smoke trail and start of chimney!
Next is to build the wooden arch form to go over the entire Kiln!

Tuesday, November 10, 2009

First Fire in Kiln!!


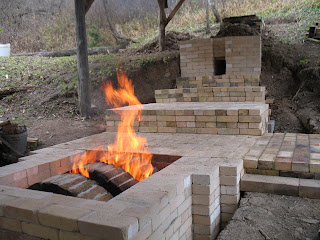
I decided to burn out the wooden arch support in the firebox before I built the kiln up any higher. Just in case the arch failed and I would have to rebuild it, I wanted to be able to easily get into the firebox.
But the arches held!!!!!
Now to celebrate I am drinking Sake!

Sunday, November 8, 2009

Bricks and more Bricks!!


Completed the back wall and smoke trail! Built the chimney up 12 levels and I will leave it there until the rest of the kiln is completed and finish the chimney last.
You can also see in the picture that I started work on the side loading door area. I will build it up to be level with the kiln floor.
The other picture is a November butterfly fluttering around the kiln!

Thursday, October 29, 2009

Upcoming Show!!!


On Saturday November 28th I will be in a show at the Black Sheep Vineyard in Adena, OH!
Also participating will be Melanie Steffl with her fabulous oil paintings of the local area.
Everyone is invited to come and talk with us about our Art and drink some very good wine!
For more details and directions visit: http://blacksheepvineyard.com/2009/10/26/09fam4/

Friday, October 23, 2009

Smoke Trail Work!


Work has been commencing on the kiln. The front arched firebox grate is finished and so I moved to the back to work on the smoke trail and chimney.
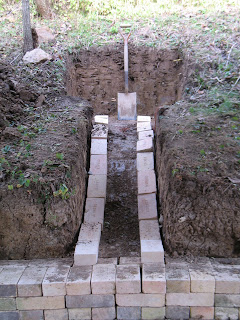
What that meant was more digging! I took a picture of the dugout smoke trail with my trusty shovel where the chimney will be. But I was able to finish the back wall and the smoke trail! When I get the chimney built up I will cover the smoke trail with a big bed of clay.
Now I will take a short break from building as I have to get more bricks and more fireclay.
(and I have to figure out how to build the side loading door into the main design of the kiln. It has me somewhat stumped for now...)

Tuesday, October 20, 2009

Firebox Work!


I have really been trying to put some time in with the Kiln! Been working on the front Firebox. I built it up and added my primary air intakes and getting ready for the brick arched grate.
You can see the arch form setting down in the firebox and some of my arched grate finished (I have to put in 1 more row)


These are just pictures of the firebox with primary air access and with the start of the arched grate system.


This is a picture of my brick piles, cleaned, stacked, and ready to use!!


Friday, October 16, 2009

Finally Mortaring bricks down!!!!


So it has been a long time coming, but I am finally laying bricks for the kiln! After spending all summer cleaning bricks (chiseling through the 4000 plus brick pile, stacking, and organizing them by name and heat durability...) I am finally again to the point of continuing the actual Kiln.
I have started with the firebox at the front of the kiln and I am working my way up.
My roof has worked out really well as all my bricks are stacked under it and I can work out of the rain!

Wednesday, July 29, 2009

Anagama Beavers


These three Beaver tails were fired in the Astoria Dragon Kiln in April as part of the workshop that I attended. The rest of my work went through a major mishap with UPS and the little that survived the cross country journey arrived to late to be included in this firing. (It was very graciously fired in the next firing and I hear with good results...)
These pieces I traveled with on the plane (and had a hard time getting through airport security with bisqued beaver tails) where they lost my luggage and I thought the beaver tails as well. But luckily I received my bags and at least was able to fire them in the river of fire that is the Astoria Drgon Kiln.
They are a first step in a conversation with the beavers here in Ohio...
Many thanks to those who are a part of the community that swirls around the Astoria Dragon Kiln!

Thursday, July 9, 2009

Kiln Floor Finished!


So after gethering, scraping, cleaning, and setting over 1200 bricks....The Kiln Floor is finished!!!!
This picture was the kiln 1 year ago...
Finally feels like I am making some progress

Wednesday, July 8, 2009

Chamber floors


Floor work continues...cleaning brick, leveling the ground and foundation, settin bricks level with sand...
I am working on the third step up now...not much more to go


Wednesday, June 17, 2009

Kiln work continues and Fired the calcine kiln


It rained this morning, but I was still able to put in a good chunk of time working on the kiln. Working on the foundation for the rest of the kiln. Finished digging it out (the rain had made it sooo humid!), set bricks in level on the sides, and spread gravel to help with drainage. Next I need to clean more brick and then I will be ready to set the back floor....
Also spent the day calcining a young fox that we found dead along the road the other day...

Friday, June 12, 2009

Kiln Building-Firebox Floor set!


I returned a month ago from the workshop in Oregon and, finding myself without a job, really spent a good chunk of time working on my own Ohio Anagama Kiln. I decided not to use the Fox Hole Kiln, so I sealed it up and continued digging out the foundation.
The actual kiln foundation is a 2" bed of gravel with a 2" bed of sand/portland cement. I level the first course of bricks onto the dry bed of sand and then wet it down real well to set the portland cement underneath. The gravel should help keep any water from settling under the kiln.
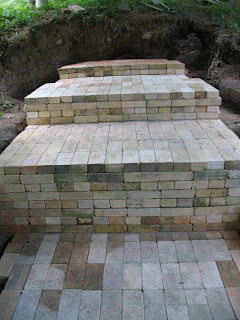
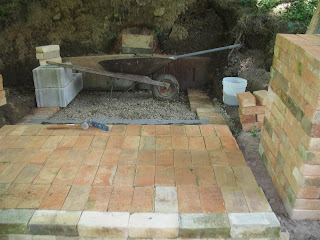
The pictures above show my finished Firebox floor and the first step up in to the chamber. Pretty exciting to be actually setting the floor down!!!!
The big toad I found under my first pallet of bricks that I used...


Thursday, April 9, 2009

Preparing for Workshop!!

I am trying to get everything prepared for the upcoming workshop!
I had a very unfortunate first bisq firing...in that all of my homemade clay bodies completely melted!!! I even thought that I had ruined my electric kiln, but upon further inspection I was able to fix it. (The bottom picture is of my melted work as it came out of the kiln!)
SO, back to the drawing board and I made a small round of work (Bmix cone 10) and incorporated some local slip and the inclusion of a small percentage of local yellow clay for character. They came out of the bisq just find and are ready to be glazed and shipped!
The beaver tails are important to me with this firing as the change that they represent...I am soaking them in the acid mine waste creek so they can soak up some of the orange waste and be changed into something beautiful...
We collected some beaver wood for the firing and along the way we came to a place where there were beaver tail prints in the mud.... Makes me feel that I am on the right path...




Sunday, March 8, 2009

Attending April Workshop!!!


I will be traveling out to Astoria, Oregon for a workshop called "The Dragon Kiln Crosses Cultures".It is a two-week event intended for all artists in the region who are interested in the Anagama pottery experience. The event will include a lecture at the CCC Performing Arts Center, featuring a visual presentation by Jack Troy and traditional Japanese koto music by Mitsuki Dazai, a 2-day clay making class, and a 6-day hands-on firing workshop in which the pieces brought or created will be fired in the Astoria Dragon Kiln. Along with the lecture and workshops, Professor Troy will exhibit his most recent Anagama work at the CCC Art Center Gallery.
I will be attending thanks to the generous support of the Ohio River Border Initiative who awarded me with a fast track grant to cover the cost of the workshop.
I am really excited to work with Jack Troy, Richard Rowland, and the Astoria Dragon Kiln community!


Thursday, March 5, 2009

Firing the Beaver Calcine Kiln


I fired the Beaver Kiln this week! It was pretty exciting just to fire a kiln and play with the fire. I loaded the small chamber with Beaver bones (to use in a glaze), Deer bones (to use in the making of a clay body), and seashells (for use as a whiting in a glaze). I also loaded the kiln with cone packs, just as a temperature test, and the kiln worked beautifully for calcining materials! I dropped cone 08 in the chamber and that was hot enough for the purpose of the kiln.


Friday, February 27, 2009

Speaking of Beavers...


SInce we are talking of Beavers...I have also decided to make a mold of two Beaver Tails (from the same beavers that will be calcined). I was able to work on them in my new studio! It is great having all of my materials together in one large space to work with. The plaster molds are finished and drying and I hope to use them to make clay beaver tails very soon. (The other picture is of the mama and baby goat that I am temporarily sharing my studio with until it warms up...aren't they cute!)

Beaver Kiln


Because of Beavers, I have decided to build a small wood kiln.
This Kiln is for calcining the bodies of some Beavers that my friend Carl had trapped for their fur. My intent is to burn the beavers down and use their bones as bone ash in a glaze. I will also be able to use it to calcine any other materials that I come across and I will also be testing it for temperature to see how hot it can get (to see if I may be able to fire work in it as well...)
The bricks are all dry laid because it is just a temporary calcining kiln.
Some technical details:
The firebox is 4' long x 18" wide and tall
The stacking chamber is 18" wide x 20" Long and Tall
The chimney is 6' Tall x 9" wide
The flame path will be roughly 16' long
I hope to fire it next week and will post the results!